Note
This guide applies to Steeltoe v3. This component has been removed from v4.
Work Queues Tutorial (using Steeltoe)
Prerequisites
This tutorial assumes RabbitMQ is downloaded and installed and running on
localhoston the standard port (5672).In case you use a different host, port or credentials, connections settings would require adjusting.
Where to get help
If you're having trouble going through this tutorial you can contact us through Github issues on our Steeltoe Documentation Repository.
Introduction
In the first tutorial we wrote programs to send and receive messages from a named queue. In this tutorial we'll create a Work Queue that will be used to distribute time-consuming tasks among multiple workers.
The main idea behind Work Queues (aka: Task Queues) is to avoid doing a resource-intensive task immediately and having to wait for it to complete. Instead we schedule the task to be done later. We encapsulate a task as a message and send it to a queue. A worker process running in the background will pop the tasks and eventually execute the job. When you run many workers the tasks will be shared between them.
This concept is especially useful in web applications where it's impossible to handle a complex task during a short HTTP request window.
Preparation
In the first tutorial we sent a message containing
"Hello World!" as a string. Now we'll be sending strings that stand for complex
tasks. We don't have a real-world task, like images to be resized or
PDF files to be rendered, so let's fake it by just pretending we're
busy - by using the Thread.Sleep() function. We'll take the number of dots
in the string as its complexity; every dot will account for one second
of "work". For example, a fake task described by Hello...
will take three seconds.
Please use the same VS2022 setup you used in first tutorial. We will follow the same pattern for this tutorial and for all of the rest of the tutorials in the series.
As a reminder you should:
- Create a VS2022 solution with an initial
Consoleapplication project which will become theReceiver. Add aTut2Receiverclass to the project. - Add a
Worker Serviceproject to the solution. Name the projectSenderand rename theWorker.csfile toTut2Sender.cs. - Update the
.csprojfiles with the Steeltoe RabbitMQ messaging package reference. - Update both
Program.csfiles to use theRabbitMQHost.
Here is what the Program.cs file for the receiver should look like when you're done:
using Microsoft.Extensions.DependencyInjection;
using Microsoft.Extensions.Hosting;
using Steeltoe.Messaging.RabbitMQ.Extensions;
using Steeltoe.Messaging.RabbitMQ.Host;

namespace Receiver
{
    internal class Program
    {
        static void Main(string[] args)
        {
            RabbitMQHost.CreateDefaultBuilder(args)
                .ConfigureServices((hostContext, services) =>
                {
                    // Add the rabbit listener
                    services.AddSingleton<Tut2Receiver>();
                    services.AddRabbitListeners<Tut2Receiver>();
                })
                .Build()
                .Run();
        }
    }
}
And here is what the sender Program.cs file should look like:
using Steeltoe.Messaging.RabbitMQ.Host;

namespace Sender
{
    public class Program
    {
        public static void Main(string[] args)
        {
            RabbitMQHost.CreateDefaultBuilder(args)
                .ConfigureServices(services =>
                {
                    services.AddHostedService<Tut2Sender>();
                })
                .Build()
                .Run();
        }
    }
}
Notice in the code above we did not add the Queue to the service container; like we did in the first tutorial. Instead, in this tutorial and those that follow, we are going to leverage another feature of Steeltoe that enables us to declare RabbitMQ entities (i.e. Queues, Exchanges, Bindings, etc) using a declarative attribute based approach leveraging .NET attributes. We will see the usage of this when we update Tut2Receiver below.
Sender
We will modify the sender to provide a means for identifying
whether it's a longer running task by appending dots to the
message in a very contrived fashion. We will be using the same method
on the RabbitTemplate to publish the message ConvertAndSendAsync().
The Steeltoe documentation defines this as, "Convert a .NET object to
a message and send it to a default exchange with a
default routing key."
Here is what the Tut2Sender looks like:
using Steeltoe.Messaging.RabbitMQ.Core;
using System.Text;

namespace Sender
{
    public class Tut2Sender : BackgroundService
    {
        private const string QueueName = "hello";

        private readonly ILogger<Tut2Sender> _logger;
        private readonly RabbitTemplate _rabbitTemplate;
        private int dots = 0;
        private int count = 0;


        public Tut2Sender(ILogger<Tut2Sender> logger, RabbitTemplate rabbitTemplate)
        {
            _logger = logger;
            _rabbitTemplate = rabbitTemplate;
        }

        protected override async Task ExecuteAsync(CancellationToken stoppingToken)
        {
            while (!stoppingToken.IsCancellationRequested)
            {
                _logger.LogInformation("Worker running at: {time}", DateTimeOffset.Now);
                var message = CreateMessage();
                await _rabbitTemplate.ConvertAndSendAsync(QueueName, message);
                _logger.LogInformation($"Sent '" + message + "'");
                await Task.Delay(1000, stoppingToken);
            }
        }

        private string CreateMessage()
        {
            StringBuilder builder = new StringBuilder("Hello");
            if (++dots == 4)
            {
                dots = 1;
            }
            for (int i = 0; i < dots; i++)
            {
                builder.Append('.');
            }
            builder.Append(++count);
            return builder.ToString();
        }
    }
}
Receiver
Our receiver, Tut2Receiver, simulates an arbitrary amount of time for
a fake task in the DoWork() method where the number of dots
translates into the number of seconds the work will take.
Again, we leverage a RabbitListener on a queue named hello just like in the first tutorial.
Here is what the code for the Tut2Receiver looks like:
using Microsoft.Extensions.Logging;
using Steeltoe.Messaging.RabbitMQ.Attributes;
using System.Diagnostics;

namespace Receiver
{
    [DeclareQueue(Name = "hello")]
    internal class Tut2Receiver
    {
        private readonly ILogger _logger;

        public Tut2Receiver(ILogger<Tut2Receiver> logger)
        {
            _logger = logger;
        }

        [RabbitListener(Queue = "#{@hello}")]
        public void Receive(string input)
        {
            var watch = new Stopwatch();
            watch.Start();

            DoWork(input);

            watch.Stop();

            var time = watch.Elapsed;
            _logger.LogInformation($"Received: {input} took: {time}");
        }

        private void DoWork(string input)
        {
            foreach(var ch in input)
            {
                if (ch == '.')
                    Thread.Sleep(1000);
            }
        }
    }
}
You should notice a couple new changes in the receiver that you did not see in the first tutorial. First notice the attribute on the Tut2Receiver class:
[DeclareQueue(Name = "hello")]
The above is a declarative way in Steeltoe to add a queue to the service container. In the first tutorial we used the AddQueue() method in Program.cs; in this tutorial we have switched to using the attribute mechanism instead.
We will expand on this mechanism in upcoming tutorials when we need to declare exchanges, bindings, etc.
The second change you should see is in how we reference the queue in the RabbitListener attribute:
[RabbitListener(Queue = "#{@hello}")]
This syntax uses a Steeltoe feature that leverages a built in expression language that is executed when the Rabbit Container is created. To use the language, you enclose the expression inside a #{...} as shown above. In this case the expression is @hello. The @ symbol is part of the language; it is used to specify a reference to a service from the service container. What follows the @ symbol is interpreted as the name of the service in the container you wish to reference. In this case, the service name hello is specified, and it is the name of the Queue that was added to the service container using the [DeclareQueue(..)] attribute we mentioned above.
This is how the RabbitListener attribute ties the Receive(..) method to the hello queue declared above.
Putting it all together
Compile both projects using dotnet build.
cd tutorials\tutorial2
dotnet build
Run multiple Receivers in different command windows and then start up the sender:
# receiver1

cd receiver
dotnet run

# receiver2

cd receiver
dotnet run

# sender

cd sender
dotnet run
Notice how the work that is produced by the sender is distributed across both receivers.
Message Acknowledgment
Doing a task can take a few seconds, you may wonder what happens if a consumer starts a long task and it terminates before it completes. By default once RabbitMQ delivers a message to the consumer, it immediately marks it for deletion. In this case, if you terminate a worker, the message it was just processing is lost. The messages that were dispatched to this particular worker but were not yet handled are also lost.
But we don't want to lose any tasks. If a worker dies, we'd like the task to be delivered to another worker.
In order to make sure a message is never lost, RabbitMQ supports message acknowledgments. An acknowledgement is sent back by the consumer to tell RabbitMQ that a particular message has been received, processed and that RabbitMQ is free to delete it.
If a consumer dies (its channel is closed, connection is closed, or TCP connection is lost) without sending an ack, RabbitMQ will understand that a message wasn't processed fully and will re-queue it. If there are other consumers online at the same time, it will then quickly redeliver it to another consumer. That way you can be sure that no message is lost, even if the workers occasionally die.
By default Steeltoe takes a conservative approach to message acknowledgement. If the listener throws an exception the underlying Rabbit Container created by Steeltoe (note: we talked about it the first tutorial) calls:
channel.BasicReject(deliveryTag, requeue)
Requeue is true by default. This is the typical behavior you want as you don't want to lose any tasks.
But, there are sometimes you want the message to be dropped (i.e. not requeued). You have two ways to control this in Steeltoe. You can explicitly configure the Container Factory we mentioned in the first tutorial to default to false for requeue when it creates Rabbit Containers. Or, the other option is in the RabbitListener code you write, you throw a RabbitRejectAndDoNotRequeueException instead of some other exception. In this case Steeltoe will not requeue the message and instead just acknowledge it.
Acknowledgements must be sent on the same channel the delivery was received on. Attempts to acknowledge using a different channel will result in a channel-level protocol exception. See the doc guide on confirmations to learn more. Steeltoe generally takes care of this for you, but when used in combination with code that uses RabbitMQ .NET client directly, this is something to keep in mind.
Forgotten acknowledgments
It's a common programming mistake to miss the
BasicAckwhen using the .NET client directly. Its an easy error, and the consequences can be serious. Messages will be redelivered when your client quits (which may look like random redelivery), but RabbitMQ will eat more and more memory as it won't be able to release any un-acked messages.Steeltoe helps to avoid this mistake through its default configuration and managing the acknowledgement for the developer in the
Rabbit Container.
Message Durability
In the previous section we discussed how to make sure that even if the consumer dies, the task isn't lost. We learned that by default, Steeltoe enables and manages message acknowledgments for the developer. But our tasks will still be lost if RabbitMQ server stops.
When RabbitMQ quits or crashes it will forget the queues and messages unless you tell it not to. Two things are required to make sure that messages aren't lost: we need to mark both the queue and messages as durable.
Messages are persistent by default with Steeltoe. Note the queue
the message will end up in needs to be durable as well, otherwise
the message will not survive a broker restart as a non-durable queue does not
itself survive a restart. With Steeltoe you can specify the durability of queues using the Durable property
on the DeclareQueue attribute.
If you want to have more control over the message persistence or over any other aspects of outbound
messages in Steeltoe, you can use RabbitTemplate#ConvertAndSend(...) methods
that accept a IMessagePostProcessor parameter. IMessagePostProcessor
provides a callback before the message is actually sent, so this
is a good place to modify the message payload or any headers that will be sent.
Note on message persistence
Marking messages as persistent doesn't fully guarantee that a message won't be lost. Although it tells RabbitMQ to save the message to disk, there is still a short time window when RabbitMQ has accepted a message and hasn't saved it yet. Also, RabbitMQ doesn't do
fsync(2)for every message -- it may be just saved to cache and not really written to the disk. The persistence guarantees aren't strong, but it's more than enough for our simple task queue. If you need a stronger guarantee then you can use publisher confirms.
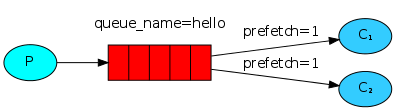
Fair dispatch vs Round-robin dispatching
By default, RabbitMQ will send each message to the next consumer, in sequence. On average every consumer will get the same number of messages. This way of distributing messages is called round-robin.
With this default RabbitMQ mode, dispatching doesn't necessarily work exactly as we want. For example in a situation with two workers, when all odd messages are heavy and even messages are light, one worker will be constantly busy and the other one will do hardly any work. Well, RabbitMQ doesn't know anything about that and will still dispatch messages evenly.
This happens because RabbitMQ just dispatches a message when the message enters the queue. It doesn't look at the number of unacknowledged messages for a consumer. It just blindly dispatches every n-th message to the n-th consumer.
One solution that is commonly recommended is to use a RabbitMQ feature called prefetchCount and to set the count to 1.
This tells RabbitMQ not to give more than one message to a worker at a time.
Or, in other words, don't dispatch a new message to a worker until it has processed and acknowledged the previous one.
Instead, it will dispatch any new message to the next worker that is not still busy.
However in most of the cases using a prefetchCount equal to 1 would be too conservative and severely
limit consumer throughput.
Instead Steeltoe defaults the prefetchCount to 250. This tells RabbitMQ not to give more than 250 messages to a worker
at a time. Or, in other words, don't dispatch a new message to a worker while the number of un-acked messages is 250. This setting improves throughput while also enabling a Fair Dispatching of messages.
Note about queue size
If all the workers are busy, your queue can fill up. You will want to keep an eye on that, and maybe add more workers, or have some other strategy.
By using Steeltoe Messaging you get reasonable values configured for message acknowledgments and fair dispatching. The default durability for queues and persistence for messages provided by Steeltoe allow the messages to survive even if RabbitMQ is restarted.
Now we can move on to tutorial 3 and learn how to deliver the same message to many consumers.